What is composting?
Composting is a biological decomposition of organic wastes by bacteria,
fungi, worms, and other organisms occurring under aerobic conditions. During
the decomposition process these organisms break down organic waste materials
into carbon, nitrogen and other nutrients. The result is an accumulation
of dark, friable, partially decomposed material. At home, this process can
be managed by placing raw organic materials in a backyard composting structure.
Raw materials for composting include leaves, pine needles, twigs, grass,
vegetable wastes from the garden and kitchen, vacuum cleaner lint, wool,
cotton rags, sawdust, wood chips, shredded wood, egg shells, coffee grounds,
tea bags and small branches. Proper management is a key factor, since an
unmanaged compost heap may become an eyesore and an odor nuisance.
Why compost?
People compost for a variety of reasons. Composting is a cheap way of
providing an enriched organic amendment to the garden. It provides essential
plant nutrients, enhances infiltration and improves the soil's moisture
holding capability. Compost also builds up the soil structure making it
easier to cultivate, benefits soil aeration and makes it possible for course
textured soils to retain nutrients normally leached out of the plant rooting
zone. Composting is also an environmentally sound way of reducing the solid
waste a household generates. Yard waste material makes up about 20% of the
volume of collected municipal solid waste and seasonally it may account
for up to 80%. Keeping this material out of the waste stream will extend
the useful life of existing landfills, slow the need to acquire more land
for future landfills and ultimately, save communities money and/or freeing
up funding for more important community investments.
Composting Basics
Nature has provided an army of workers who specialize in decomposing
organic material. These "critters" - bacteria, fungi, molds, earthworms,
insects and other soil organisms eat all types of organic material and in
the process break down plant tissue into humus and usable plant nutrients.
The process of composting is simply a matter of providing the soil organisms
with food, water and oxygen. Anything growing in your yard is potential
food for these microbes and larger organisms. These materials provide varying
amounts of carbon and nitrogen, which nourish the organisms in your compost
pile. An easy way to provide the needed balance of carbon and nitrogen for
these organisms is to remember that brown, woody materials, such as autumn
leaves, are high in carbon while green, moist materials, such as grass clippings,
are high in nitrogen. Microorganisms use the carbon in leaves or woody wastes
as an energy source. Nitrogen provides the microbes with the raw element
of proteins and nucleic acids to build their bodies. A carbon to nitrogen
ratio of 30:1 is ideal for the activity of compost microbes. Table 1 can
help you judge the ratio of your compost ingredients. Table 2 provides less
specific, but field useful guidance for setting up your compost site. Alternating
layers of brown and green materials will yield finished compost in three
to eight months. Leaves alone break down in six to 15 months. Grass clippings
or food scraps composted alone result in unpleasant odors because they contain
more nitrogen than the compost organisms can use. Under ideal North Dakota
summer conditions compost piles can decompose in as short as 3 to 4 weeks.
Table 1
|
Carbon-Nitrogen
Ratio
|
|
Waste
|
Carbon:Nitrogen
|
|
Food
|
15:1
|
|
Sawdust, Wood, Paper
|
400:1
|
|
Straw
|
80:1
|
|
Newspaper
|
125:1
|
|
Grass
|
15:1
|
|
Leaves
|
50:1
|
|
Fruit
|
35:1
|
|
Rotted Manure
|
20:1
|
|
Cornstalks
|
60:1
|
|
Coffee Grounds
|
20:1
|
|
Alfalfa
|
12:1
|
|
Pine Needles
|
90:1
|
Table 2
|
Sources Of Carbon and Nitrogen
|
|
High Carbon (brown
ingredients)
|
High Nitrogen (green
ingredients)
|
|
Autumn Leaves, Straw, Paper
Products, Coffee Filters, Corn Stalks, Wood, Pine Needles
|
Grass, Weeds, Food, Egg
Shells, Coffee Grounds, Tea Bags, Manure, Alfalfa, Blood Meal
|
Volume
A large compost pile insulates itself and holds the heat of microbial
activity. Its center will be warmer than its edges. Piles smaller than three
feet cubed (27 cu. ft., 3-4 ft. tall) have trouble holding this heat in
the winter, while piles larger than five feet cubed (125 cu. ft., 5-6 ft.
tall) do not allow enough air to reach the microbes at the center. These
proportions are of importance if your goal is fast, high temperature composting.
Large piles are useful for composting diseased plants or trees as the high
temperatures will kill pathogens, weed seeds, and insects.
Aeration
Microbes active in composting require oxygen to efficiently break down
organic materials. Bulky materials such as leaves, pine needles, chipped
twigs, and straw keep the compost pile from settling and allow air to enter.
The compost pile should be periodically turned or mixed to incorporate oxygen.
Heat is generated by the microbes during the decomposition process. Turning
also shifts material from the outer (cooler) part of the pile to the center
(hotter). The frequency of turning depends upon the materials being composted,
the compost temperature and the moisture conditions, but generally should
be done on a weekly basis in warm weather.
Temperature
Temperature is a function of pile size, oxygen and moisture content.
To reach temperatures desirable in composting, a pile must be large enough
to provide an insulating effect for the interior of the pile. Temperature
is an important environmental factor affecting biological activity and composting
is dependent on this activity. Each type of organism has an optimum temperature
range. Composting is designed to function in the range of 95° Fahrenheit
(F) - 160° F. The most effective range for composting seems to be 122° F
- 131° F. Higher temperatures of 130° F - 140° F generated in compost may
destroy weed seeds and pathogens; however, it is difficult in a home compost
system to mix a pile appropriately to bring all wastes to the center and
assure complete their destruction. At temperatures above 149° F many of
the organisms involved in composting become inactive or die. Turning should
definitely be done if the temperature in the center of the pile reaches
140° F or if odors are present.
Moisture
Microbial activity requires adequate moisture, usually 40-60%. At this
moisture level, a handful of the compost will feel wet but water cannot
be squeezed out of it. The compost pile must be kept moist, but excessively
wet materials compact and restrict the movement of air through the pile,
start to ferment and cause odor problems. Since moisture evaporates as the
pile heats up (a sign of active composting), let rain and snow replace the
moisture loss or add water during dry spells. A cover helps retain moisture
in hot weather, but never cover compost piles with plastic because this
restricts air movement.
Particle Size
Reduction in the particle size of raw materials will increase the speed
of the composting process by increasing the surface area available for microbes
to attack. To help speed up the composting processes, it is a good idea
to chop small limbs, twigs, and garden wastes with a shovel or run them
through a shredding machine or lawn mower. The more surface area the micro-organisms
have to work on, the faster the materials decompose. Size reduction also
reduces the volume of the compost pile, thereby saving space.
Composting Start-up
The following guidelines will get you started, but your own experience
will help you tailor a method that best fits your needs.
Build or purchase a compost bin. Check to see if your community has a
composting bin distribution program or ordered a bin from a garden catalogue,
nursery, or hardware store. Enclosed compost piles keep out pests, hold
heat and moisture in and have a neat appearance. Bins are also easily constructed.
Bins can be simply made of wire, wood, pallets, concrete blocks, even garbage
cans with drainage holes drilled in them. Figures 1, 2, 3 & 4 show examples
of compost bins you can build yourself. In urban areas, rodent-resistant
compost bins having a secure cover and floor and openings no wider than
one-half inch are suggested.
Set up the bin in a convenient, shady area with good drainage. A pile
that is about three feet square and four feet high will help maintain the
heat generated by the composting organisms throughout the winter. Although
a smaller pile may not retain heat, it will compost.
Start the pile with a layer of coarse material such as corn stalks to
build in air passages. Add alternating layers of "brown" and "green"
materials
with a shovel full of soil on top of each layer. Shredding leaves or running
over them with a lawn mower will shorten the composting time. Be sure to
bury food scraps in the center of the pile. Add water as you build the pile
if the materials are dry.
As time goes on, fluffing the pile with a hoe or compost turning tool
each time you add material will provide oxygen to the organisms actively
breaking down the compost pile. A complete turning of the pile so the top
becomes the bottom, in spring and fall should result in finished compost
within a year. More frequent turning will shorten the composting time.
Compost Bins That Can Be Built For Home Use
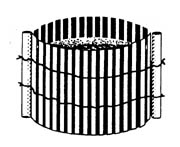 Snow
Fence Bin
Snow
Fence Bin
Bins made with prefabricated snow fencing are simple to make and easy
to move and store. To build this bin, buy the appropriate length of prefabricated
fencing, and fasten two-by-fours as corner posts to the bottom to form a
circle.
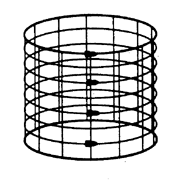 Woven
Wire Bin
Woven
Wire Bin
One easy to make, economical container requires only a length of woven
wire fencing. Multiply the diameter you want for the compost heap by 3.2
for the length of fencing to purchase. Fasten the ends with wire or three
or four small chain snaps (available at any hardware store) to make a circle.
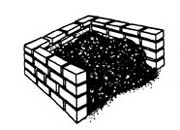 Cement
Block Bin
Cement
Block Bin
Compost bins can be made with cement blocks or rocks. Just lay the blocks
without mortar; leave spaces between each block. To permit aeration. Pile
them up to form three sides of a square container or a three-bin unit. This
bin is sturdy, durable, and easily accessible. Keep the bin at least 3 inches
away from the walls of your house to prevent deterioration of siding.
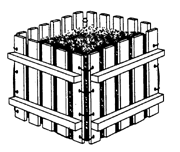 Wooden
Pallet Bin
Wooden
Pallet Bin
Covered bins allow convenient protection from pests and heavy rains.
Construct bins with removable fronts or sides so that materials can be easily
turned. Old wooden pallets can be used for construction. Wire mesh can be
substituted for wooden sides to increase air flow.
Composting Problems and Remedies
|
Symptoms
|
Problem
|
Solution
|
|
Bad odor
|
Insufficient air
|
Turn pile
|
|
Dry
|
Lacking water
|
Moisten and turn pile
|
|
Damp and warm only in center
|
Small pile size
|
Increase size and turn pile
|
|
Pile not warm
|
Lack of nitrogen
|
Add green source and turn pile
|
Meat
Although meat scraps, fat, bones, grease, dairy products, salad dressing,
and cooking oil are compostable these foods ferment or putrefy, cause odors,
and can attract rodents and other nocturnal animals that can be pests. Only
experts in composting should attempt to compost these materials and they
should not be incorporated in the home compost pile.
Ashes Wood ashes are a source of lime and should be added to a
compost
pile only in small amounts if at all. Large amounts of lime will cause loss
of nitrogen from the pile.
Newspaper
Although ordinary black-and-white newspaper is compostable, it has low
nitrogen content and decomposes slowly. It tends to compact and restrict
airflow unless shredded. It is recommended that newspaper be recycled rather
than composted.
Herbicides
Grass clippings and leaves treated with herbicides should not be used
as mulch immediately after mowing, but should be composted. The most widely
used pesticides degrade rapidly during composting or become strongly bound
to organic matter in the compost. Materials exposed to herbicides with active
ingredients such as clopyralid and picloram have demonstrated the ability
to persist after composting. It is advised not to utilize material treated
with these active ingredients for composting.
Temperatures 160° F The larger the pile, the higher the
temperature
and the faster the composting proceeds, but only up to a certain point.
At temperatures higher than 160° F, composting slows down and charring or
burning begins. This can become a real problem in dry composts, particularly
in the summer.
Completion
When the composted materials look like rich, brown soil, it is ready
to use. Apply one-half to three inches of finished compost and mix it in
with the top four inches of soil about one month before planting. Compost
can be applied as a top dressing in the garden throughout the summer. Compost
is excellent for re-seeding lawns, and it can be spread one-quarter inch
deep over the entire lawn to rejuvenate the turf. To make potting soil,
mix equal parts compost, sand and loam. You may put the compost through
a sieve to remove large particles - these can go back into the pile.
This information is available in a color brochure format. To download
the brochure follow this link: Composting In Your Backyard Brochure.
Resource reference:
Compost Tips For The Home Gardener
Composting At Home
Composting
Practices
For additional information contact:
Division of Waste Management
4201 Normandy Street
Bismarck ND 58503-1324
Telephone: 701-328-5166


